Extending Templates
While creating your application model Skipper can automatically create some elements for you. In these situations it is necessary to tell Skipper how the new elements should look like. To do this Skipper uses model elements templates. These templates are fully customizable.
Template use
The templates have various uses and can be very complex, but when properly set they can save you lots of time. For example you want to set up the Skipper so you will have the primary key defined automatically for all new entities together with createdAt and updatedAt columns.
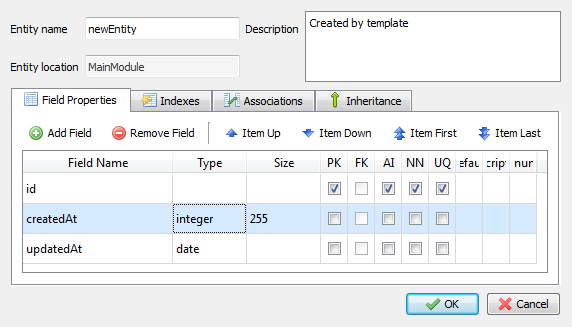
To have all future entities set up like this with just one click, you only need to add following template to your configuration files:
<template element='entity' use-case='create'>
  <entity name="newEntity" description="Created by template">
    <field name="id" required="true" primary="true" auto-increment="true"/>
    <field name="createdAt" type="integer" size='255'/>
    <field name="updatedAt" type="integer" />
  </entity>
</template>
Thanks to the configuration structure of Skipper you can have at once several set of templates that can be different for each project or each ORM Framework. Check the articles about configuration files and xml configuration file structure for more details how the configuration is applied and how to modify it.
Predefined template library
Most common and most useful templates are already defined and published in the template library. There you can check the examples of templates prepared for real production application.
Template definition
Templates are defined in the XML format. You can define for what entity the template will be used, when it will be used and of course what values will the template apply. Template definition looks like this:
<template element='project' use-case='create' selector='new-project'>
 	...
 </template>
This is a header for a template. It contains element (template type), use-case (context) and selector.
Note: Selectors are only used in special cases. More on selectors later.
Template types
The element='' parameter specifies for what type of element the template will be applied. In Skipper, you can define template for every element used in the model.
Enumeration of types: Project, Module, Region, Entity, Comment, Association, Many-to-many, Inheritance, Index, Field, Many-to-many-entity, Inheritance-Parent, Inheritance-Child
Structure of the templates is the same as the structure of the project. More about template types and their structure can be found in the template reference guide.
Template context (use-case)
Template context defines when the template will be applied. You can set different templates for the same type of element depending on whether the element was created or changed.
| use-case | used when | use frequency |
|---|---|---|
| create | user creates an element (before the editor window opens) | used only once |
| update | user applies changes to an element (when the editor window is confirmed) | used repeatedly |
| template | user selects field template from "Add Field Template" context menu in Entity editor | used manually |
Note: When the new element is created, not only the create template, but also the respective update template will be used after you close the dialog to save changes.
On-create templates
Template create is used when a new element is created from the GUI. Every time you create a new element or a new relation, Skipper will check if a create template exists for that element. If the template exists, it will be applied.
Example
The following template will be applied to all entities created in the project. Their name will be set to "newEntity", and the "id" field and its settings will be added automatically.
<template element='entity' use-case='create'>
  <entity name="newEntity">
    <field name="id" type="integer" required="true" unique="true" primary="true"/>
  </entity>
</template>
On-update templates
Template update is used when an element is modified from the GUI. On-update templates are applied whenever changes are confirmed in the Element Editor. This is most useful when your templates use some substitution marks for the attributes or fields.
Example:
You want to ensure that for each entity its table name will always be: 'ModuleName_EntityName'. The value will be updated every time you change the name of this entity (when the editor closes). The template looks like this:
<template element='entity' use-case='update'>
  <entity>
    <orm-attributes>
      <attribute name="table">{module}_{entity}</attribute>
    </orm-attributes>
  </entity>
</template>
Note: The update template is executed when entity object is changed. This means that if you change the name of the module, the change will not be propagated until you edit the entity again and confirm the changes in the dialogue.
"Template" templates
Template template is used to define a custom user templates in the application. Currently only field templates are supported in the Entity editor.
Example:
You want to define a new field template with user details. We name it userDetails and define name, age and sex fields. The template looks like this:
<template element="field" use-case="template" selector="userDetails" caption="User details" caption-group="4custom">
  <field name="name" type="string" required="true"/>
  <field name="age" type="decimal" required="true"/>
  <field name="sex" type="char" required="true"/>
</template>
Note: selector value is internally used as unique template identifier, caption is visual text used in a drop-down menu and caption-group is used to separate templates to several groups by divider.
Selectors
Whenever you create or update an element and it is necessary to create or update related elements automatically the selector is used to define the template. This applies for creating new project, importing a project and creating or updating relations in your model.
| selector | allowed element | use-case | used when |
|---|---|---|---|
| project_new | project | create,update | new project is created |
| primary_field | field | create,update | project is imported |
| association-field | field | create,update | association is created |
| discriminator-field | field | create,update | inheritance is created |
| many-to-many-field | field | create,update | many-to-many is created |
| many-to-many | entity | create,update | many-to-many is created |
| "custom text" | field | template | field templates in entity editor |
Example 1
Following template will be applied when the project is imported from the schema file. For all entities without primary key the key will be automatically added and its properties set up.
<template element='field' use-case='create' selector='primary-field'>
  <field name="id" type="integer" required="true" unique="true" primary="true"/>
</template>
Example 2
Following template will be applied when association is created. It will automatically name the association field created inside the owner entity. Notice that you do not have to modify the owner entity manually, the association-field template will do the work for you.
<template element='field' use-case='create' selector='association-field'>
  <field name="{entity-inverse#UL}_id"/>
</template>
Example 3
Following template defines a field template in the entity editor which creates UUID as PrimaryKey.
<template element="field" use-case="template" selector="uuid" caption-group="1field">
  <field name="uuid" type="uuid" required="true" unique="true"/>
</template>
Name variables
If you want to have the names for fields or attributes to follow name rules without extra work, or you want certain properties using variable values, you can set up templates with substitution marks and naming styles. When the source element or relation changes the change will be reflected in the name variable automatically.
Substitution marks
Substitution marks are used to automatically fill in the values of defined attributes. When applied, substitution mark will be replaced with the value it is referencing. This is very useful for example when creating relations, you can automatically set up association field name or aliases for parent and children.
<template element="field">
  <field name="{substitution_mark_name}"/>
</template>
Substitution marks are denoted by brackets and list of all available marks is available in the reference guide.
Example
You want the association field for all associations created in the project named as 'InverseEntityName_Id'. The template will look like this:
<template element='field' use-case='create' selector='field_association'>
  <field name="{entity-inverse#CFU}_{field-inverse#CFU}"/>
</template>
Naming Styles
Skipper supports several naming styles because each user and project can have their own rules. Following styles are supported at the moment:
| Keyword | Description |
|---|---|
#CFU | CamelCaseFirstUpper |
#CFL | camelCaseFirstLower |
#UL | under_line |
#CFUs | CamelCaseFirstUpper in plural form |
#CFLs | camelCaseFirstLower in plural form |
#ULs | under_line in plural form |
Use these as postfixes together with substitution markers to generate required result.
Example
In this example we will be creating association field from the entity Inverse entity with primary key entity_Id:
Case A: This template will result in 'Inverse_entity_entity_Id'.
<template element='field' use-case='create' selector='field_association'>
  <field name="{entity-inverse#UL}_{field-inverse#UL}"/>
</template>
Case B: Following template will result in 'inverseEntity_EntityId'.
<template element='field' use-case='create' selector='field_association'>
  <field name="{entity-inverse#CFL}_{field-inverse#CFU}"/>
</template>